|
 |
|
Photoshop - Text in a Circle
This is
for Photoshop 5 or higher.
Drawing text along a path or placing text in a circle is something that many people ask about. Until now, it was really difficult to accomplish without a vector program such as Illustrator or Corel DRAW! With Photoshop 5's new features, however, it has become possible to place text in a circle with relative ease. It's still more time consuming than with a drawing program, but, once you've got your text the way you want it, another new feature will let you easily edit the type!
This tutorial uses two new features of Photoshop 5. The first is a feature that enables you to move the center of rotation of an object and the second is editable type layers.
The editable type layers means that you can go back to a type layer and change the text, change the font you used, and its size, and even change the font or size of individual letters. Very cool!
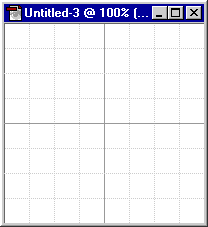
To get started, open a new 200 x 200 x 72 dpi image. Set the Contents to white and the mode to RGB.
With the new image open, choose View, Show Grid to show the grid (see figure 16.1).
|
|
|
Figure 16.1 |
Select the Type Tool and position the mouse on the second line down from the top of the grid and exactly in the middle horizontally. This will position your type near the top and in the middle of the image.
-
Click to bring up the Type Tool dialog box.
-
Choose your font and its size. I used Arial at 30 points.
-
Click in the large white area and enter the number 1.
-
Click OK to enter the text into the image. It will appear on a new layer. Click on the small eye icon to the left of the layer in the Layers Palette to turn off the layer's visibility.
-
Place the mouse back in the same place and click to bring up the Type Tool dialog box.
-
Enter the number 2 and click OK.
-
Turn off this layer, as well.
-
Click the mouse in the same place again and enter the number 3 in the Type Tool dialog box.
-
Continue this process until you have entered 7 numbers.
NOTE: I'll be working with seven characters and you might want to do the same just to follow along. Later you can re-create this image at a different size and with a different number of characters.
You should now have seven numbers (1 through 7) on seven separate layers as well as the background layer.
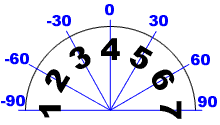
To place the letters properly you'll need to use a little math. Ack!!! I know, I know… Scary subject, right? No problem! Here's how it works. The top letter (or number in this case) is at 0. Since I'll be placing the text along a semi-circle there's 180 degrees to work with. Photoshop likes to break the angles up into plus and minus so the last letter will go at 90 degrees and the first letter will go at -90 degrees (see figure 16.2).
|
|
|
Figure 16.2 |
In figure 16.2 you can see what the angles are for all of the letters. I arrived at these numbers by doing a little simple arithmetic, not higher math. Because I was working with 7 letters and the 4th or middle letter was at zero that left 3 to the left (the minus side) and three to the right (the plus side). Each side has 90 degrees, right? And 90 divided by 3 is 30. Voila! Each letter would be separated by 30 degrees. These numbers will be different for each image if you use more or less than 7 letters. Again, though, as I mentioned above, you can change the type so you'll only have to do this once for each image.
Anyway, let's get started on moving the numbers into place.
-
The last number you entered, the 7, should be on the only visible layer.
-
Choose Edit, Transform, Rotate.
One thing you might notice, as opposed to earlier versions of Photoshop, is that you now have a center of rotation marker. It's a small circular icon with a line at the top, bottom, and each side. It might be a little difficult to see so you may want to zoom in.
You can grab this icon and drag it around to create a new center of rotation. Drag it to the center of the image and it should snap into place on the grid. If it doesn't, check to be sure by choosing View, Snap to Grid, that this option is on.
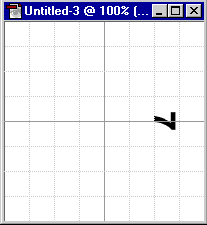
You can now move the cursor back over the number 7 and drag it down to the 90 degree mark.
You can make this move more accurate by turning on the Info palette so that you can see what the angle is. As well, you can move the number in angular increments by holding down the shift key. When the number is in place press the Enter key (the Return key on a Mac) to complete the transform.
Figure 16.3 shows the number 7 in its place.
|
|
|
Figure 16.3 |
Make the layer with the 6 active by clicking on its layer in the Layers palette.
Choose Edit, Transform, Rotate and drag the center of rotation point to the center of the image. Now drag the 6 into place at 60 degrees and press the Enter key.
Repeat the process with the 5 (it goes at 30 degrees) and the 3 (it goes at -30 degrees), the 2 (at -60 degrees), and finally the 1 (at -90 degrees). The number 4, of course, stays at its original position at the top of the semi-circle.
With all of the numbers in place you should save this image.
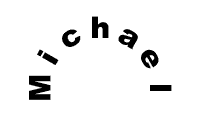
You can now edit each number and replace it with a letter. How? Easy! Just double-click on a type layer. Doing so will bring up the Type Tool dialog box enabling you to change each character.
Figure 16.4 shows the numbers replaced with the letters of my name.
|
|
|
Figure 16.4 |
Using this technique you can create circular and semi-circular text. As well, you can save the results and go back in later to change the text.
That's it!
|